Thursday, March 23, 2017

Evolution of Design and the Mike Tyson rule


Ever heard of the Mike Tyson rule? "Everyone has a plan until they get punched in the mouth". This rule can be applied to a lot of things-even design.

Problem: I recently pulled three ethernet cables to wire my front living room so I could have secured high speed LAN access without upgrading my wireless router. When securing the cables, I had a limited number of cable clips. So I did the best I could and let most of the wires dangle in the basement.

Solution: With my 3D printer-why not print my own cable clips? I could even customize it to the specific sizes of the two cat 6 and one cat 5e cables. Awesome!

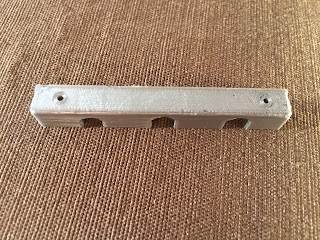
Design and Print:  Drawing the design was relatively simple. It was drawing three profile of the three ethernet cables cutting out a rectangular body.  The first design produced this:


Straightforward and practical.  It felt bomb proof but it took 25 minutes to print. Not exactly the most efficient part to replicate 8 to 10 times.  So I went ahead and optimized the design.

I thought printing from this position would result in the strongest print.

As I started trimming some stuff down, I realized I had the print orientation wrong. As opposed to printing the parts as shown in the above, I should rotate it on its side. This would be the equivalent of taking a flat bar and bending three U-shape hoops in it.  When the printer can run the filament along the entire profile, this results in a very strong configuration.  So I flipped the print on its side and produced the ultimate design for strength and speed of creation! This 'final' design printed three times faster!

This is how it would print on the 3d printer.
With the ultimate design, the next logical course of action was mass production. Note to self: This is not the next step in design. One should test the design before mass production. . . . It was easy to copy and paste using the Slic3r software and off we went.

Mass production in the works . . . unfortunately.

Installation: Here comes Mike Tyson. I went ahead and tried to nail the cable tie and immediately encountered a problem. Nailing my cable tie upside down was very difficult. The angle and positioning I had to hold the hammer, I struck the cable tie. Repeatedly. To the point that it broke.

This did not survive the Mike Tyson rule.
Not only was the angle awkward, but the design required that I put the nail head past the humps. This required precision hammering. Precision hammering upside down was impossible-unless I spent 10 minutes micro tapping the nail. The nail setter I had would make hammering to tight. So I stopped  hammering the nails flush with the clip and just bent them once they were secured. It was a hack-but I resigned myself to just getting this done.

Did it look pretty? Nope. Did it satisfy my sense of awesome execution? Nope. Did I get the job done? Yep. And sometimes getting something done is what counts.

Original cable ties.
Painfully hammered flush nails. This took too long to get it right.
Bent nails! The hack way of getting it done!

Conclusion:  Next time-before I mass produce a design is to run it by the Mike Tyson rule. Despite your best efforts at what you think is perfection, make sure you test in a live environment or with a real customer!

Until next time. Happy Printing!

Iterate and test often!

Sunday, March 12, 2017

Sydney's Projects

Home made organizer


My little maker built some great things out of recycled materials. I interviewed Sydney on her inspiration and design process.

Me: What did you make?

S: I made an organizer out of recycled materials because my supplies were not easily accessible and I also made an ear bud container because my ear buds always became tangled in my pencil case.

Me: Can you describe how you made the organizer and materials you used?

S: For the pencil and pen organizer I used three boxes. I painted all three boxes before I began assembly.  For the first box, I got an old Kashi bar container, cut the top off, and put another piece of cardboard to divide it into two equal sections.  Hot glue was my choice of adhesive. I have mastered hot glue.

For the second box, I used an old tea box, with the top cut off and glued it to the side of the Kashi box.

The final box, was also a tea box with the top cut off, but I cut the front side half way lower than the rest so it would provide easier access.


Ear bud holder
Me: Can you describe your ear bud holder.

S: I got two mason jar tops and put the lid in the band then got hot glue and put some around the inside not to touch the lid so it's able to spin. I did this to two tops and rolled a piece of paper up and glued it so it wouldn't unravel. I glued the rolled paper to the inside centers of the two lid. I let it dry for a few minuets. I decorated the tops and hot glued a piece of a chopstick so you could wind it up. Finally I made a hole in the piece of paper so the jack stays in place.

Original clam shell design

Me:
I understand you went through a number of iterations before your final design. What did you learn  on each iteration?

S: Well my first model had a clasp so it could open up like clam. The problem was that it didn't spin that well because it was getting stuck. This new design allows you to easily access the ear buds by  not having to open it like the first design. To access it you just pull on the ear buds and it unwinds. To roll it back up you use the chopstick on the side by twisting it and the ear buds roll up.

Final design. Just twist the lid and it winds up the ear bud cord.
Me: That's great. It sounds a lot like iterative/lean development where you build quickly test it out and then rebuild it again improving on the next design. So what are you going to do with these creations?

S: Well I might sell the ear bud holder and I gave one to my friend for their B-day. Also, I made two more desk organizers for my mom's desks at her two schools.

Me: Any future creation plans?

S: Hummmmmmmm...